PRINT-READY ARTWORK GUIDELINES
Quick Run down Already familiar with print-ready guidelines? Here’s the specifics on ours!
Do you have “complete” artwork that just needs print-ready optimization?
Our team can help! We will examine your file to determine what needs to be done and provide you a set-up fee quote. Fees vary but optimization-only normally ranges from just $10-$40.
WHY IS PRINT-READY IMPORTANT?
Many factors can affect how your finished product turns out. When it comes to printing, specifications matter!
Our job is to give you the highest-quality results possible. In order for us to make that happen, we like to work with the
best material possible in order to deliver on our promises.
We understand that submitting artwork to a printer can often be confusing. Between printer terminology, design
terminology, measurements, etc – it can seem tedious! For our customers who wish to create their own designs, we
produced this guide to cover all of the important things you need to know!
As always, we are here to help should you need any further assistance • (844) 532-3369
COLOR
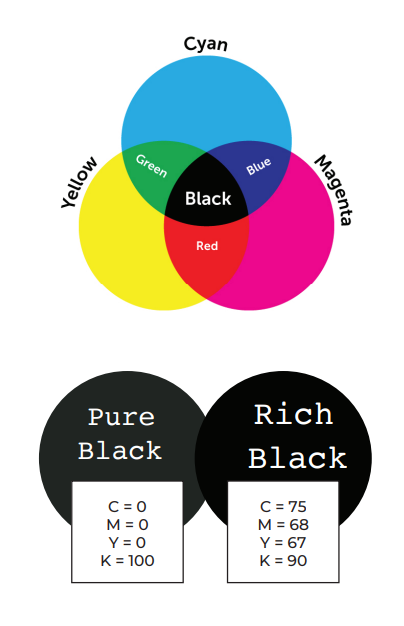
• Any files intended for printing should be saved using a CMYK color profile. This will ensure a high-quality print and color accuracy. The RGB color profile is only meant for displaying graphics on a digital screen, but not for printing. RGB files should be converted to CMYK color. Any images or graphics contained in your file should also be CMYK color.
• If your print job is CMYK only, make sure all spot colors (Pantone, etc.) are changed to CMYK.
• If your print job is a spot color (Pantone color) only, convert all CMYK or RGB images to your selected spot color.
• Use a pure 100% Black (K) when working with small characters or when the text is printed on a white background. (aka, Pure Black)
• When using black surfaces or texts that overlap other elements, it’s better to add some values in the other CMY colors. (aka, Rich Black)
TIP!
Some customers design their pieces using RGB colors because, well, they’re brighter and shinier! They look awesome when viewed on a screen, because the screen is emitting light. However, RBG colors are impossible to reproduce in print because the light is absorbed by the print medium (paper). It can be disappointing to see your vibrant artwork seemingly “dim” before your eyes when you convert RGB to CMYK, so we recommend saving yourself the heartache by designing your piece in CMYK color mode from the beginning. This way you won’t end up feeling the CMYK blues (see what we did there?) Happy designing!

BLEED
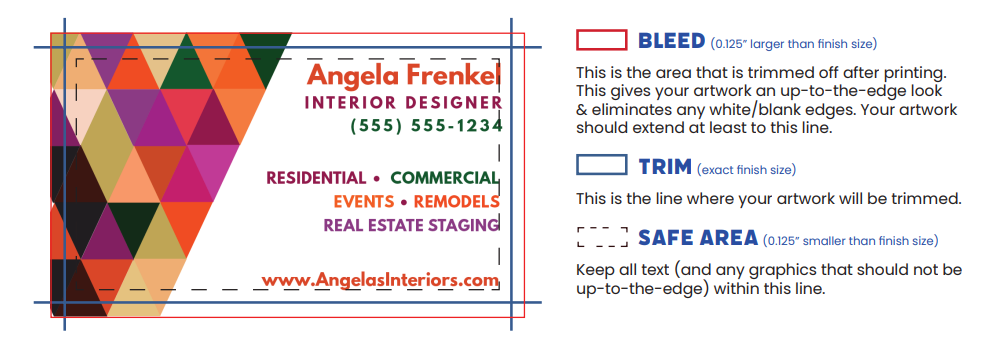
Artwork or color that extends to the edge of your printed piece needs to be designed with this in mind! Your file should have an extra margin around it, called bleed. This area is trimmed off once your document is printed, leaving just the “finished size” product. This eliminates any white edges, or your artwork being cut off in the trimming process.
Commercial trimming/cutting is quite accurate, however, environmental/mechanical factors that often are beyond control can cause slight variations in precision. Your piece could have as much as 1/16” difference (aka jog) from the designated edge. The bleed area accounts for this potential jog.
Our bleed requirement is a MINIMUM bleed of .125” (approx 3mm)
We also recommend a safe area of at least .125” within the trim line to ensure that your text or graphics don’ run too close to the edge of your final trimmed piece, or risk being cut off due to the jog we mentioned above!

RESOLUTION
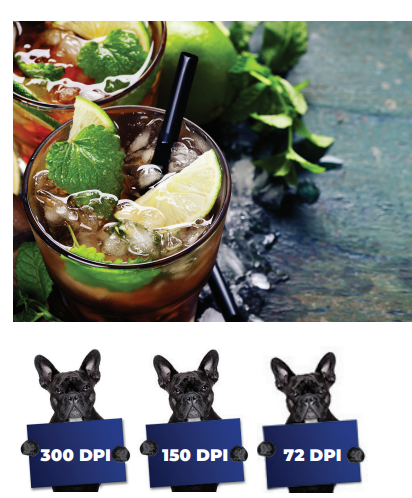
The resolution of your file should be 300 PPI/DPI (points/dots per inch) at final output size for best results.
Placed images can have a resolution of 150-300 PPI/DPI at their final output size. When pulling images or graphics from the internet or any digital source, more often than not, the resolution is too low for a high-quailty print. Using images of this nature will result in a fuzzy, grainy, or pixelated appearance. When sourcing your images, be sure to check for resolution!
Stock photo website = go crazy!
Search engine images = be careful!
Stock photo websites offer high-resolution, vibrant and professional images to use for your print & web projects. Start here! There are thousands of free Stock photo options but you may find a better selection if you are willing to shell out a few dollars for the perfect image. This approach also provides you with the usage rights to the image which is very important! Permission must be granted to use any artwork or photo that belongs to someone else. If you must resort to an image Search Engine (such as Google Images)
– use the search funcionality that allows you to filter by usage rights and size to get a better shot at finding a usable image.
An image with 300 PPI/DPI appears nice & sharp at 100% size. But if you increase that same image to a larger size to print, it will lose its sharpness. This is because the same amount of dots/pixels are being spread out over a larger amount of space. You also can’t improve an image’s resolution image by simply increasing the PPI/DPI in your design program, so beware!

FILE FORMAT
Acceptable file formats for PRINT-READY artwork
- Adobe Acrobate (.PDF)
- Adobe Illustrator (.AI or .EPS)
- Adobe InDesign (.INDD or .INDL)
- Adobe Photoshop (.PSD)
- High-Resolution .JPG
- High-Resolution .PNG
- Tagged Image File Format (.TIFF)
- Microsoft Word, Excel, Powerpoint and Publisher
- Documents will be exported as a PDF file and printed as-is
TIP!
When sending us your artwork, a ZIP file including your finished file, the fonts used in your design, and the originals of any images used is always best! They may not always be needed – but it helps to have them on hand in case anything is lost in translation or compression. That way, your designer already has
your items on hand to fix or adjust if needed!
DOCUMENT SIZES
Acceptable FINISHED SIZE DOCUMENT CHART for PRINT-READY artwork
| Brochures | 8.5″ x 11″ |
| Standard Postcards | 4″ x 6″ |
| Jumbo Postcards | 8.5″ x 5.5″ |
| Flyers, Checklist, & Letters | 8.5″ x 11″ |
| Business Cards | 3.5″ x 2″ |
| Standard Door Hangers | 3.5″ x 5.5″ |
| Jumbo Door Hangers | 4.25″ x 11″ |
FONTS
If you are sending a truly flat file type such as JPEG or PNG, no font optimization is required.
Designing with Adobe Illustrator:
• Save an .AI file with all fonts intact and as text, and embed the font or send separately to your designer
• Save an .EPS file with the fonts converted to outlines
• For printing, convert fonts to outlines and save as a PDF
Designing with Adobe InDesign:
• Export your artwork to a .PDF with your fonts embedded (Use the File > Package option to make it easy!)
Designing with Adobe Photoshop:
• Flatten your image into a single layer which will rasterize your fonts & generate a .PDF file